The ignition coil pack in your engine generate an electrical current which is transmitted through the ignition cables (spark plug wires) to the spark plug. That current then goes through the plug to give the air and fuel combination inside the cylinder. A poor ignition coil may cause a misfire or sometimes the engine unable to work. When you’ve discovered which ignition coil is resulting in the problem, you should check the engine ignition coil to make sure it’s the issue. Changing a poor ignition coil could be finished in only a couple of hours with basic hand tools.
HOW TO REPLACE IGNITION COILS
1. SECURITY FIRST
Make sure the engine is cool down, work with the emergency brake, and open the hood. Disconnect the negative battery cable before doing the job on whatever else. Notice: Examine the car’s fixing guidebook initially before disconnecting the cable. Some cars might respond negatively once the battery cable is disconnected, especially for an extended period. A memory keeper can also be applied but examine initially to prevent electrical damage or other problems.
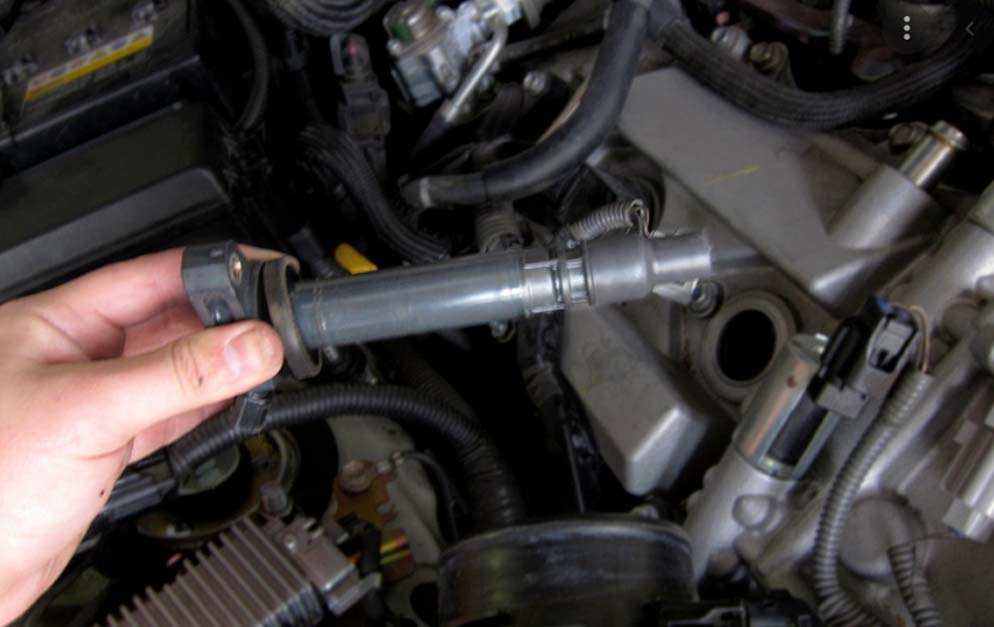
2. TAKE OUT THE IGNITION COILS
Ignition coil pack replacing may be difficult on some car’s engines. The biggest problems you are going to deal with is accessibility and sticking parts just like the ignition coil insulator boots sticking to the spark plug and tearing apart in the removing procedure. Some engine ignition coils may be hard to connect with and need getting rid of the top plenum/intake manifold. In these situations, a new plenum gasket are going to be required. Examine the Repair Guidebook for the particular car and engine.
When the ignition coils are found and accessible, cautiously detach the electrical plastic pigtail connector to prevent damaging it. In some cases, as a result of age and deterioration, the plastic connector will break. Changing the connector may be difficult so get ready and apply it carefully. After that, unscrew the coil hold down bolt(s) and take out the car ignition coil. A twisting motion is often required to get the insulator boot slip off the spark plug. If it tears apart, you will need a pick and/or needle nose pliers to take the stuck portion from the spark plug. Take care not to damage the spark plug porcelain because this can bring about a misfire and you will be back where you began once the job is finished. In the case changing more than one coil, it’s definitely a great plan to change each one at one time. In the event getting rid of two or more each time, distinguish each coil pigtail connector with stick on numbers or take a photo in advance. When the coil is taken out, check for oil or antifreeze contamination on the boot and inside the spark plug well. If present, the leak will need to be fixed to prevent upcoming damage and a continual failure of the new part.
3. CHECK EACH IGNITION COIL USING A MULTIMETER
In case that your car’s CEL was flashing, most probably there is a misfire code stored in the PCM (the car’s computer brain). Use a code reader to read the code. Generally the code will identify the culprit cylinder with the misfire. Pay attention to the word “misfire”, rather than “failed coil”. Misfires could be caused by various factors. Associated with ignition system parts including a spark plug, or fuel system component just like a fuel injector, a vacuum leak, and also an internal mechanical engine issue creating low cylinder compression, will be probable options for miss-fire symptoms. Ignition coil failure is common but if uncertain, there are several solutions for examining.
If the coils are fairly simple to access, try replacing the suspicious coil with another coil on the engine. If the misfire “follows” the suspicious coil to the other cylinder, the coil has failed. If this is not available because of limited access, make use of a multimeter and check the primary and secondary winding of the coil. If you get a reading that’s out of the normal range, you will have to to change the car ignition coil. The owner’s guidebook ought to list the normal resistance range. Given that you understand if the coil (if any) has failed, you are able to install the replacement. Before doing so, it’s a great plan to take out and check the spark plug. Again, check for contamination and fix any oil or coolant leaking. Additionally, examine and take out any debris in the spark plug well.
4. LUBRICATE THE COILS INSTALL THEM
Check out you have got the right enigine ignition coil. Check the length and pigtail connections and terminal pins. After that, make use of dielectric grease to the inside tip of the replacement ignition coil insulator boot/shield. This can guarantee a good seal against moisture and aid removing in the future. Precisely install the coil, pressing it onto the spark plug. Then, re-install the coil hold down bolt and then carefully reconnect the electric pigtail. A very tiny volume of dielectric grease might be used and might be used to the coil or the pigtail/connector. Make sure the connector fits snugly and you feel the connector tab engage and lock onto the coil.
5. EXAMINE YOUR JOB
Re-install the other parts. Attach the negative battery cable, start the engine, and take your car for a testing drive.
When you are sure the issue is fixed, clear the trouble codes.
In the event your car has got bad ignition coil symptoms, it is time for a little do-it-yourself action. Get the engine ignition coil from our site and ensure to check and change all failing ignition coils just before your car stops working entirely.